HOW TO MESURE CO2 GAS VOLUME IN BEVERAGES
HOW TO MESURE CO2 GAS VOLUME IN BEVERAGES
CO2 Gas Volumes Measurement
Master Process Flowchart
Learning Objectives
What’s the Benefit for Me?
Upon completion of this module, you'll be ready to:
Identify WHY we need to measure gas volumes
Explain HOW we measure gas volumes
Describe the “gold standard” test method
Perform CO2 gas volumes analysis as prescribed in TM200.001
CO2 Gas Volumes
Agenda
- Background
- Altitude effect
- Bottle Equilibriating and snifting
- Zahm-Nagel Handshake test
- Calibration
- CO2 Retention Study
Why Test for Gas Volume?
- Measures the amount of carbonation in a beverage
- Each product has a designed carbonation level
- CO2 provides:
- Sensory experience
- Microbiologic protection
- Package integrity
Gas Volume Definition
One gas volume = the cubic volume of carbon dioxide gas (at standard temperature and pressure of 0 degrees C and 1 atmosphere) which dissolves in an equal volume of liquid.
CO2 in a Beverage
Gas volumes are proportional to the ratio of temperature and pressure
CO2 Slide Rule
- Pressure and temperature readings are converted to gas volumes
- Carbonation levels are calculated by:
- Measuring the temperature of a sample
- Measuring the pressure of a sample
- Correcting for altitude
- Finding the result on a gas volume chart
Altitude Correction
- Gauge pressure must be corrected for altitude
Corrected Pressure = Gauge Pressure - Altitude Correction Factor
Sample Preparation
Equilibrating
Equilibrating
- Gentle inverting of bottled beverage (15 times in 30 seconds) to move undissolved CO2 to liquid
- Aid in moving air in the liquid into a headspace
Handshake Test
- Purpose
- to determine the amount of carbonation in a beverage sample, measured as the number of “gas volumes”
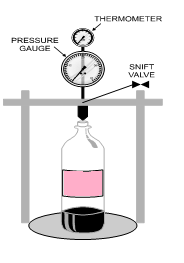
- Uses the Zahm-Nagel tester
- Measures pressure
- Measures temperature
- Uses gas volume charts to calculate the final result
Handshake Test Method - Bottles
1. Always test bottles cold, 4°C +2°C (40F 3F)
2. Equilibrate line samples by gently inverting 15 times in 30 seconds (do not shake)
3. Pierce bottle
4. Snift down to below target snift pressure
5. Agitate to a maximum constant pressure
6. Record temperature and pressure
7. Subtract altitude correction factor from pressure gauge reading
8. Calculate CO2 from a chart or Pepsi CO2 slide rule.
9. Check CO2 gas volumes after 48 hours to ensure proper carbonation.
Handshake Test Method - Cans
Always test cans at 20°C +2°C (68°F +3°F).
2. Place sample in the tester
3. Pierce bottom of the can
4. Shake to a maximum constant pressure
5. Record temperature and pressure
6. Subtract altitude correction factor from pressure gauge reading
7. Calculate CO2 from the chart or Pepsi CO2 slide rule
8. Check CO2 gas volumes after 48 hours to ensure proper carbonation.
Tips and Precautions
- Use calibrated thermometer
- Use a calibrated pressure gauge
- Use the middle third of pressure gauge to maximize accuracy
- Accurate temperature and pressure readings (avoid rounding)
- 0.5°C misread Þ 0.05 gas volume error
- 1 psi misread Þ 0.1 gas volume error
Sonic Testing
tips and Precautions
- Results must match Zahm-Nagel Handshake
- Check each package size and type
- Adjust power or time as needed
- Warm-up electronics before using (10 minutes)
- Keep package off the bottom (shelf or hanger)
- Do not place Zahm-Nagel in the water bath
- Notch base cups, if tested
- Maintain consistent water bath height for each package type
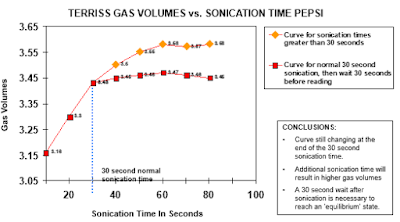
- After sonication, wait 30 seconds to reach an “equilibrium” state, to then take the pressure and temperature readings.
Calibration
Equipment Calibration
- Thermometer
- Calibrate against National Institute of Standards and Technology (NIST) or equivalent certified thermometer in a water bath
- 4°C +2°C Bottles, 20°C +2°C Cans
- Daily calibration
- Pressure gauge
- Calibrate using either:
- Deadweight tester
- NIST certified gauge
- Once per week or every 75 uses, whichever is more frequent
Thermometer Readings
Tips and Precautions
- Calibrate thermometers
- Avoid parallax error
- Know thermometer type
- Total immersion
- Partial immersion
- Check calibration of working thermometers against certified calibrated reference thermometer
- Check-in increments throughout your working temperature range
- Do not handle working thermometers by the dial
Retention Study
PET CO2 Retention Study
PET CO2 Retention Study Example
Wrap-Up
- CO2 Gas Volumes
Zahm-Nagel handshake tester is the “gold standard.”
Pressure and temperature calibration are critical.
Observe altitude corrections.
Equilibrate and snift bottles before testing.
Match other methods (ultrasonic or mechanical shaker) to Zahm-Nagel handshake results.


No comments